
A guide for your first board
How to make a vision board on your iPhone: 4 categories, step by step
 Marina · Founder of VISIYA · Updated
In about 20 minutes you'll have a vision board on your iPhone, sorted into four categories: Health, Relationships, Career and Finances. All you need is the VISIYA app and one goal you care about.
This guide is for you if you've never made a vision board. We'll build one together, tap by tap, around one example: Emma wants to open her own flower shop next year. Wherever she puts her goal, you put yours.

 Scan with your iPhone
- 4 categories
- Health, Relationships, Career, Finances
- About 20 minutes
- for your first board
- 15 steps
- each with a screenshot
- Free
- one board, template included
Before you start
What is a vision board, and what do you put on it?
A vision board is a collection of pictures and words that show what you want your life to look like. You look at it often, so your goals stay in front of you on ordinary days.
It used to be a corkboard covered in magazine clippings. On an iPhone it's quicker, and the board goes where you go: the train, the waiting room, the sofa.
To keep it from turning into a pile of pretty pictures, you split the board into categories. The app calls them life areas. Four is plenty for a first board. Give each category three to five pictures and one sentence that says what you're going for.
One rule matters more than the rest: choose pictures that make you feel something. A picture that's only nice to look at won't do much for you.
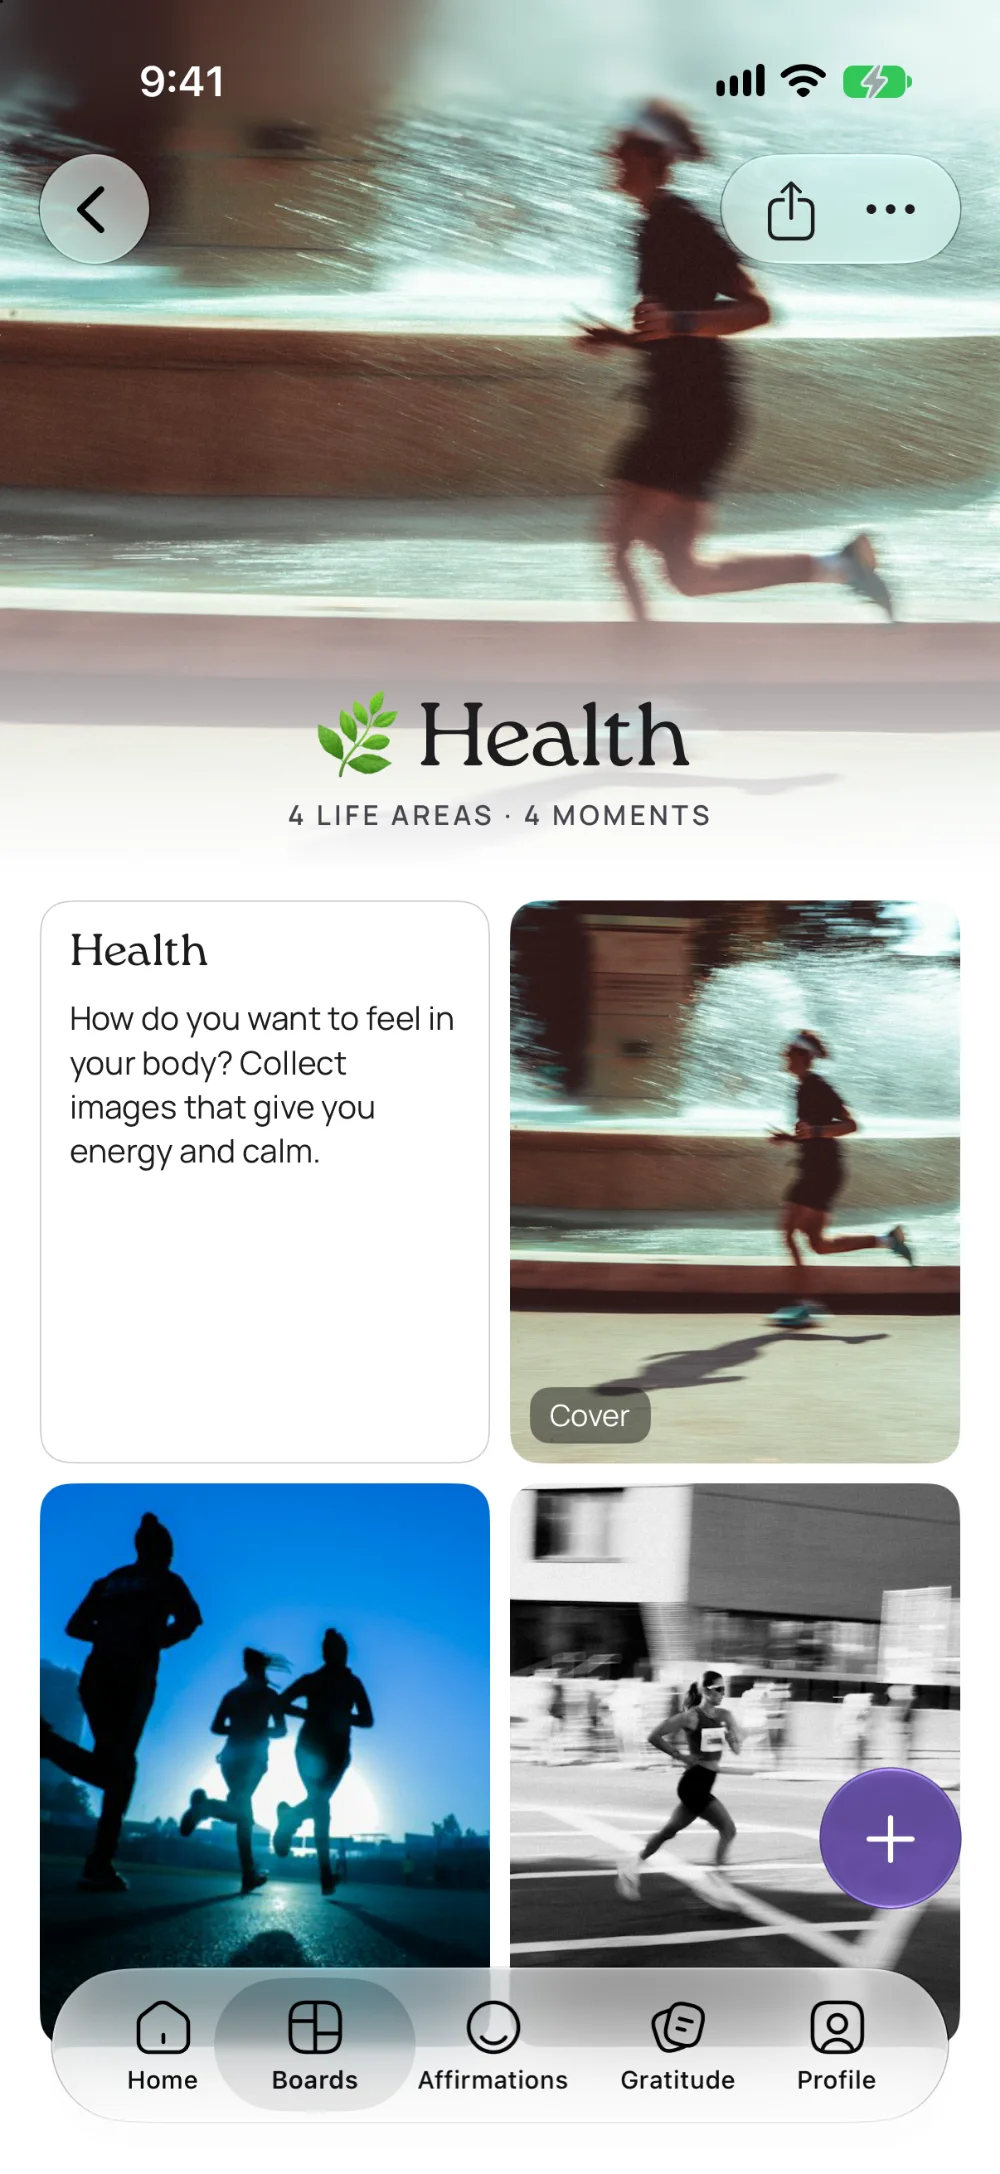
Health
How do you want to feel in your body? Collect images that give you energy and calm. For Emma: a run in the morning before the shop opens.
Relationships
Who do you want to spend more time with? Capture what closeness and connection feel like to you. For Emma: long dinners with friends.
Career
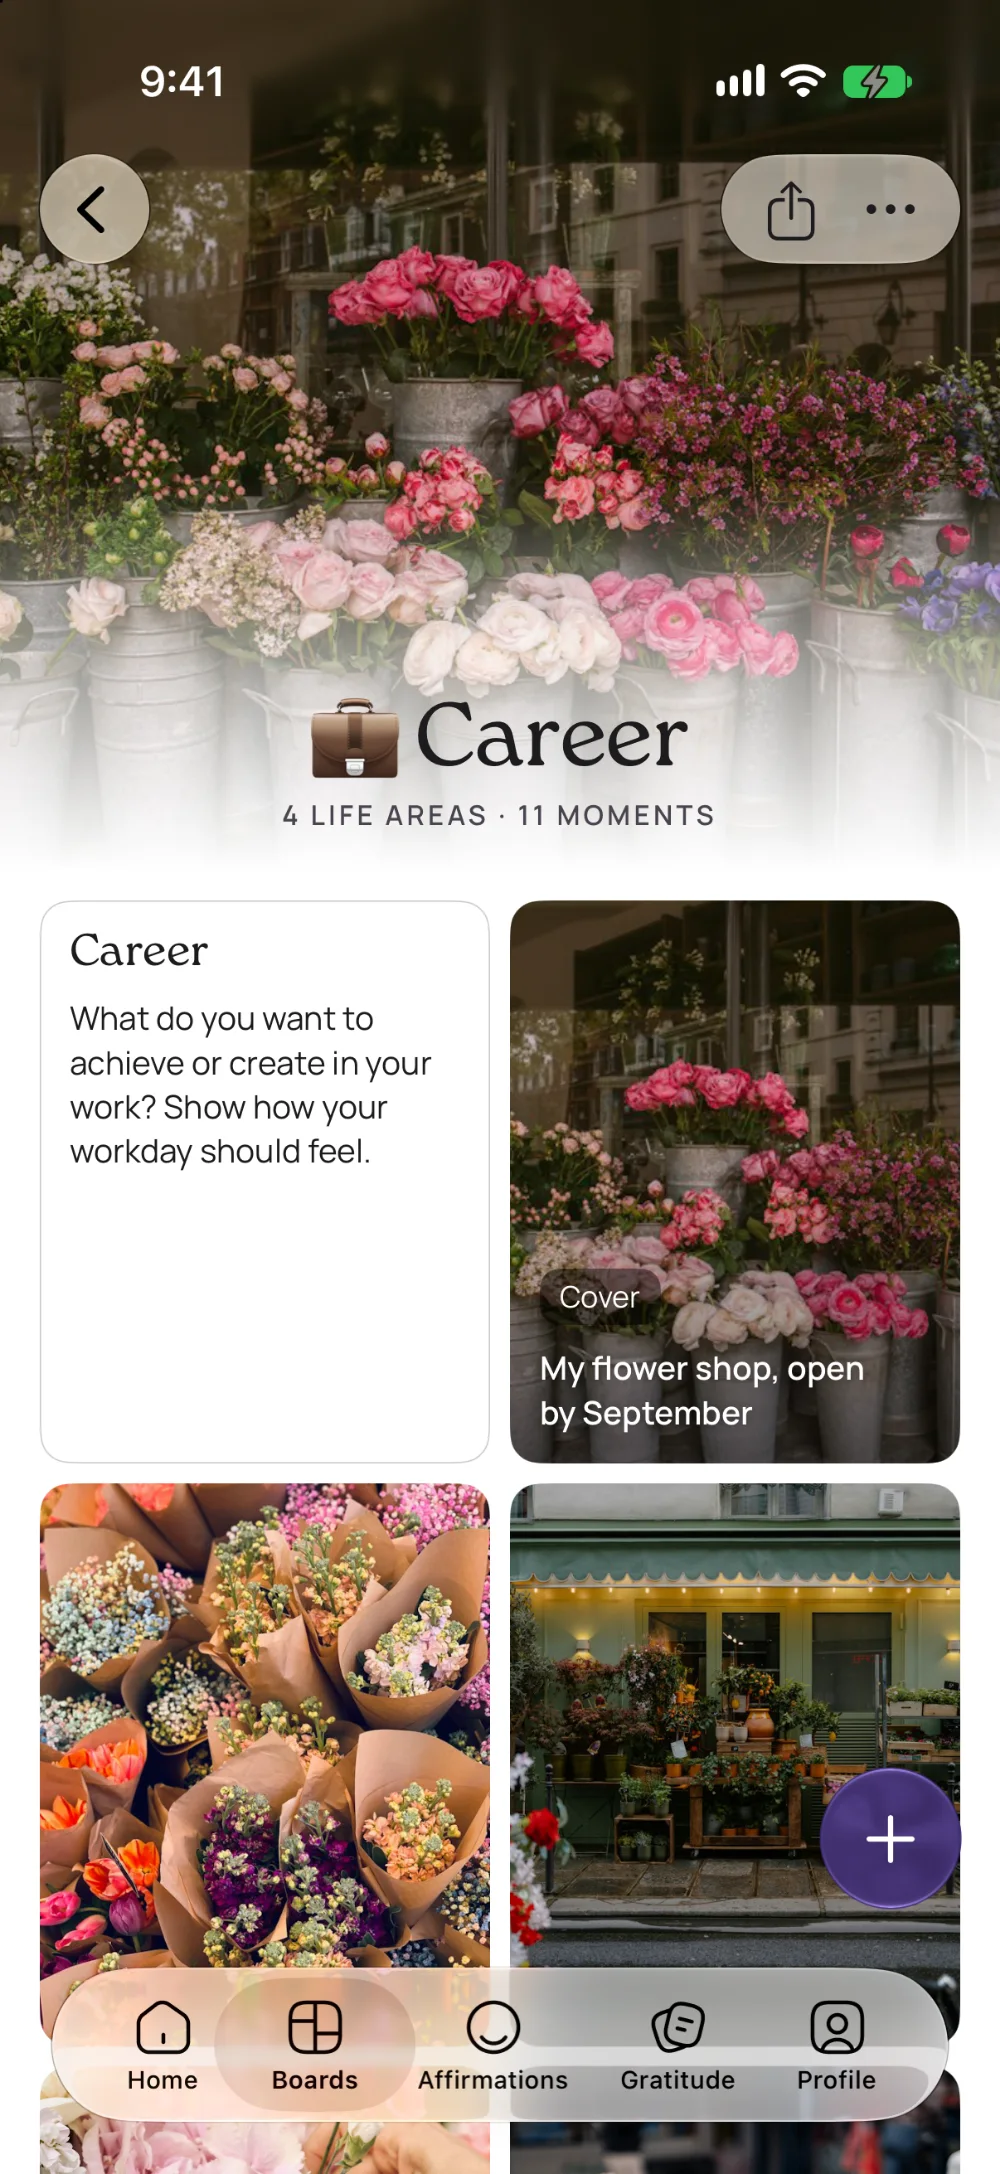
What do you want to achieve or create in your work? Show how your workday should feel. For Emma: her own flower shop. This is the category we'll fill together.
Finances
What are you saving for, what do you want to afford? Make your financial goals visible. For Emma: the money to open the shop.
What you need
- an iPhone (it works the same on an iPad)
- about 20 quiet minutes
- one big goal for next year, and a rough idea for the other three categories
- a few photos of your own, if you have them
The walk-through
How do you make a vision board on your iPhone?
Download VISIYA, choose the free “4 Life Areas” template, and fill it with pictures, a note, a link and a color. The 15 steps below show every tap.
Step 1
Download VISIYA and make a warm-up board
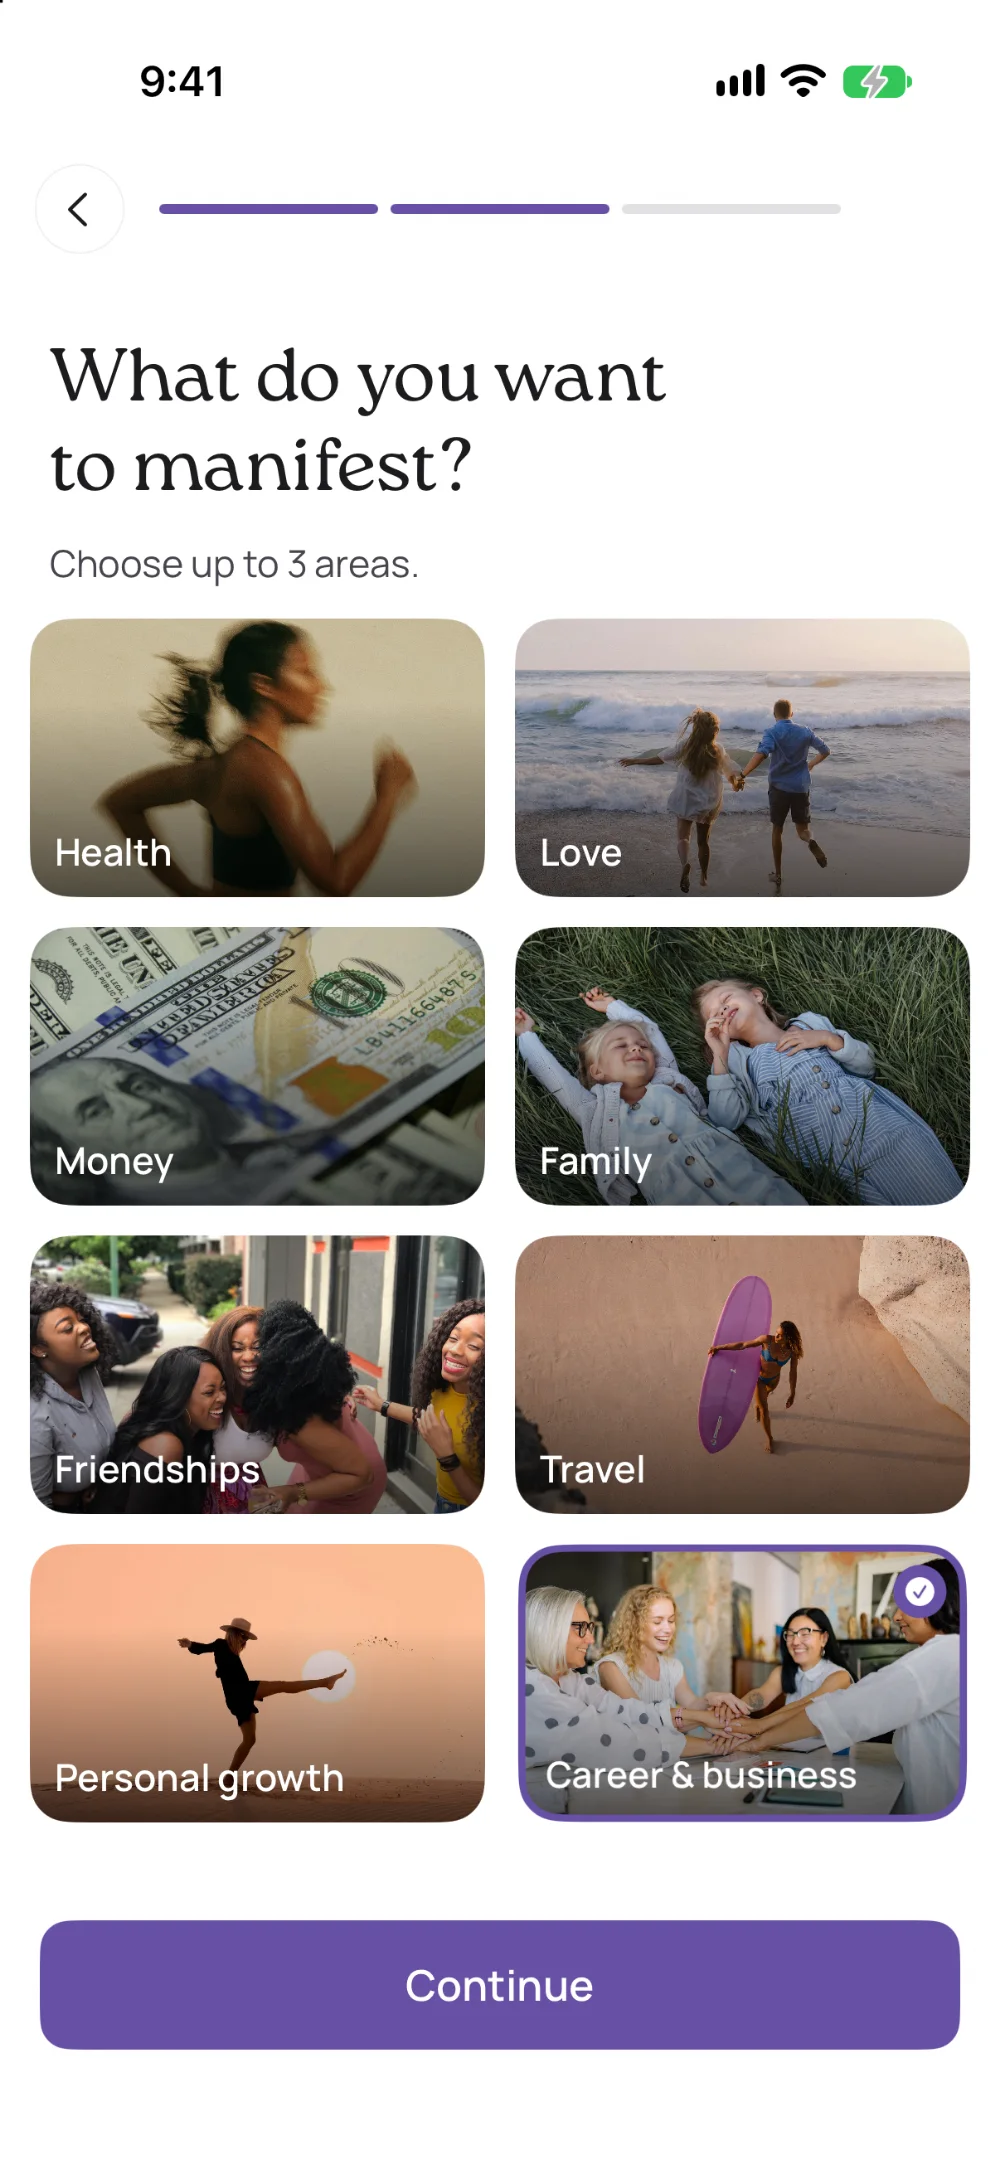
Download VISIYA from the App Store and tap “Let's go.” The app asks for your first name, then: “What do you want to manifest?” Pick the area your big goal belongs to. Emma taps “Career & business.”
Next you'll see pictures for that area. Tap at least two, then tap “Create board.” Sign in with Apple or Google so your board is saved.
That takes about a minute. Think of this first board as a warm-up: you get a feel for what a board is. Your real board, with four categories, comes right after.
Good to know: After your first board, the app shows you VISIYA Plus once. You can close the offer. You don't need Plus for this guide.
Scan with your iPhone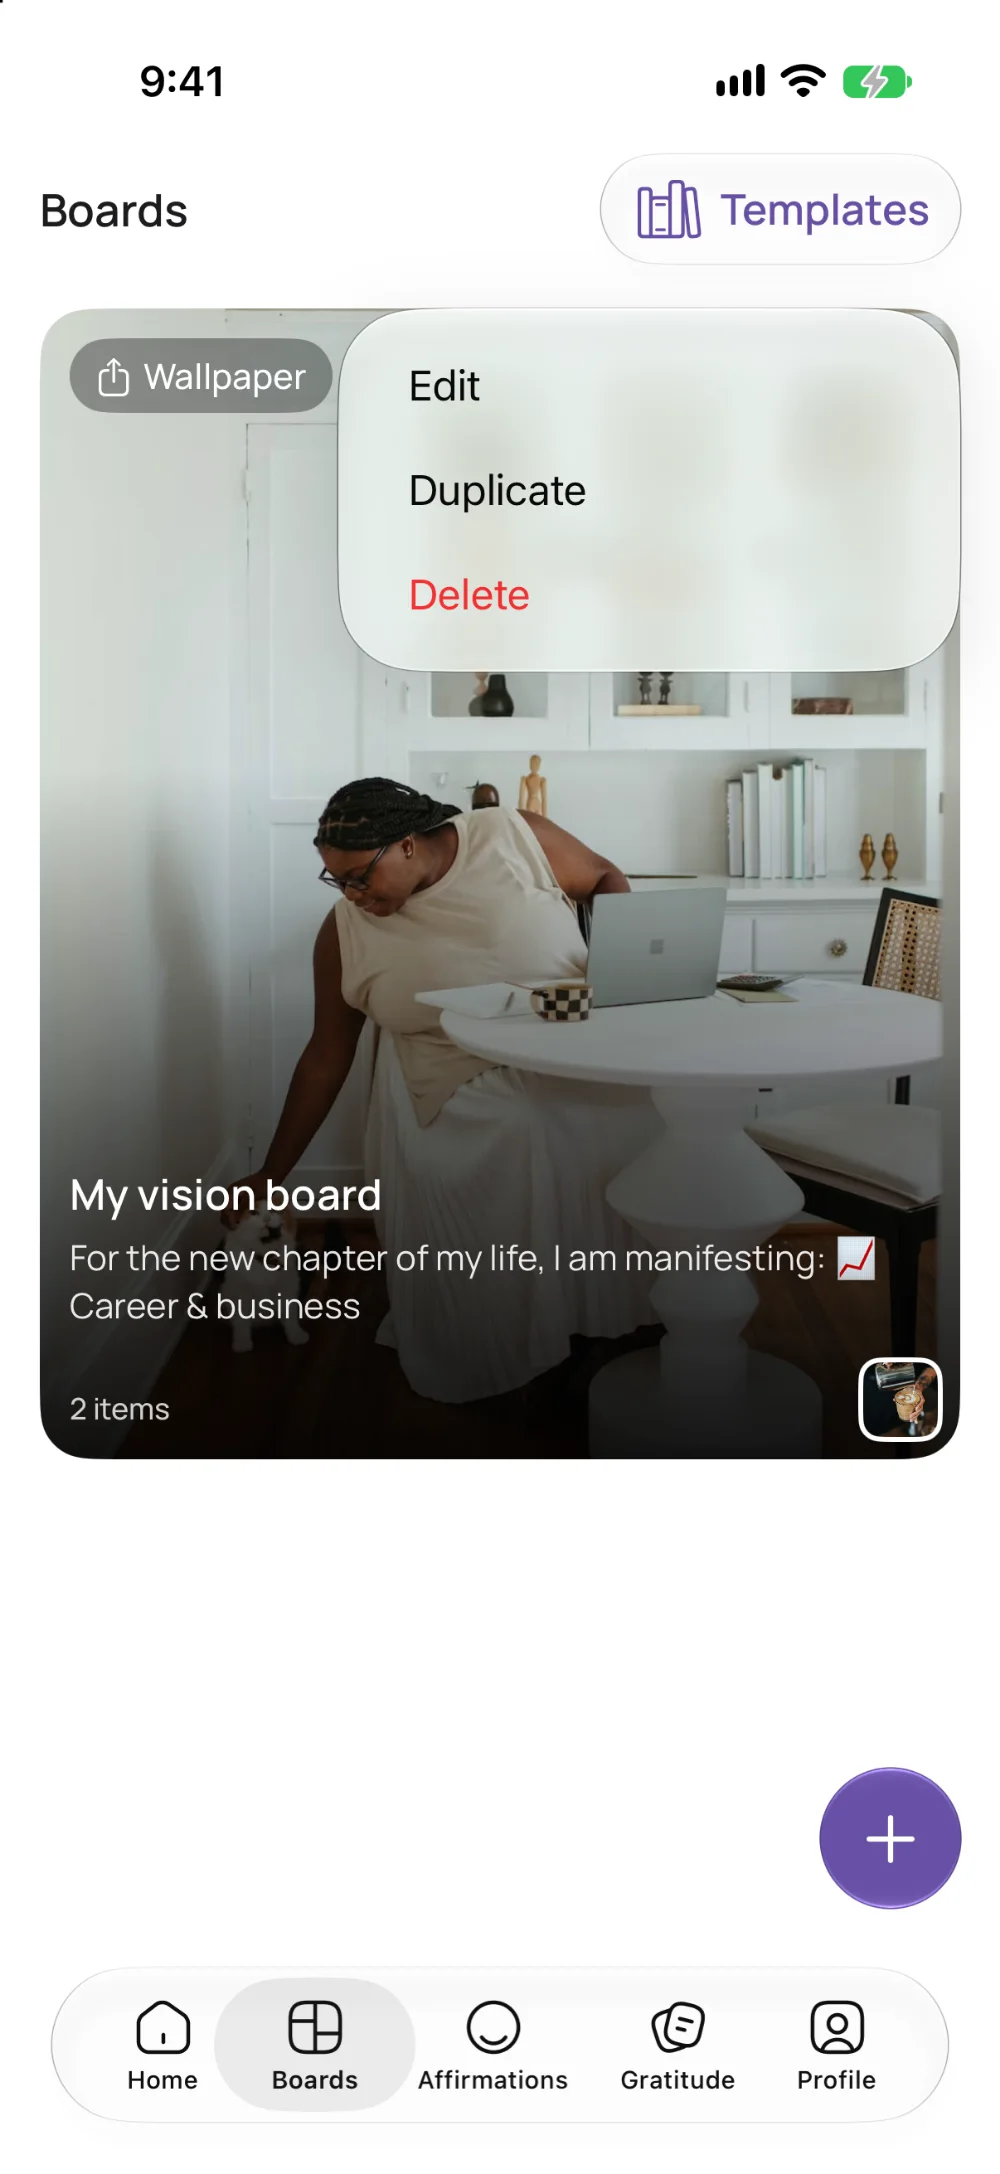
Step 2
Make room for your real board
Tap “Boards” at the bottom. Your warm-up board is there as a card. Tap the three dots on the card, tap “Delete,” and confirm.
It feels odd to delete something you just made. It took you a minute, and the board you're about to build is the one you'll keep.
Good to know: The free version holds one board, which is why you're making room for the template. With VISIYA Plus you can keep both and add more boards.
Step 3
Choose the “4 Life Areas” template
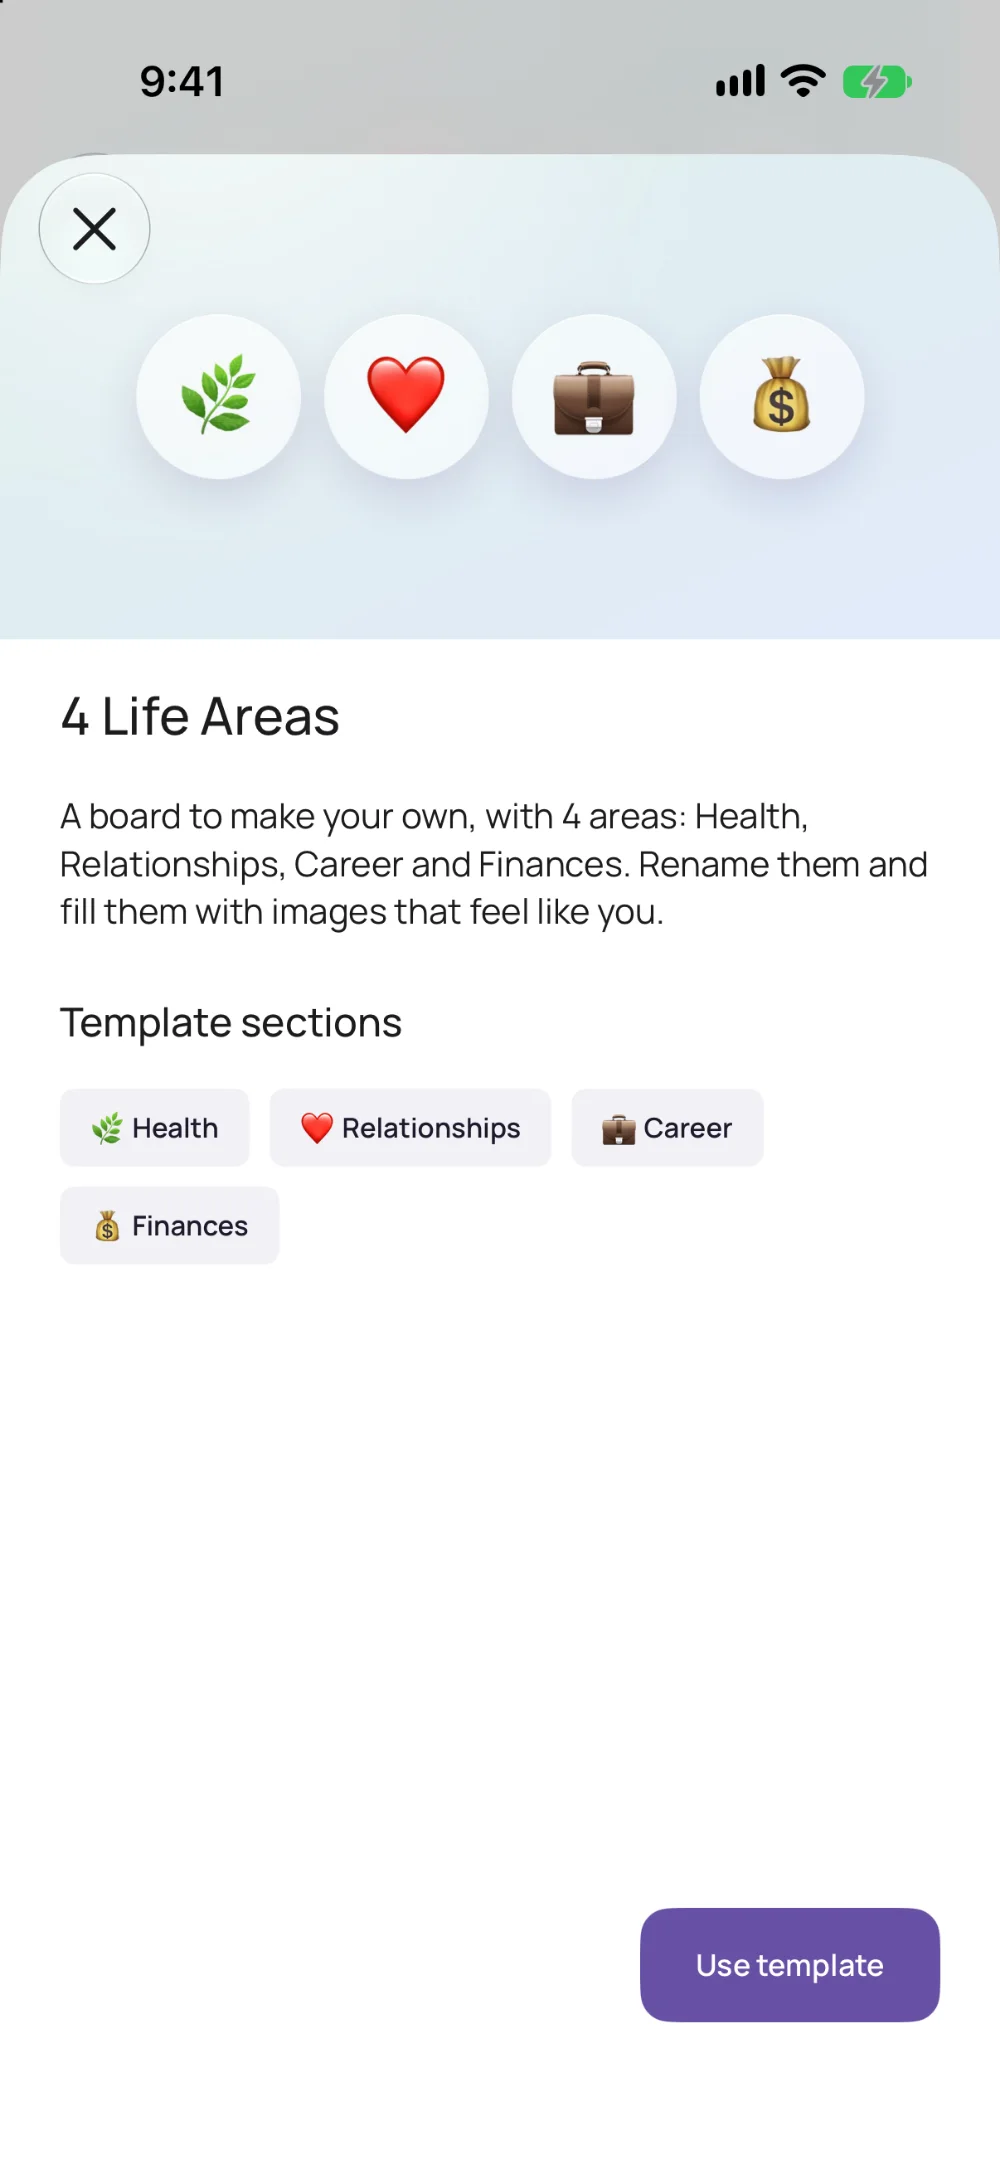
The overview is empty now. Tap “Create a board,” then “Start with a template” in the sheet that opens. You'll see a gallery of ready-made boards. Find the card called “4 Life Areas” and tap it.
The app shows you what's inside: Health, Relationships, Career and Finances. Tap “Use template.”
Tip: This template is free. Templates marked with a Plus badge are part of VISIYA Plus.
Step 4
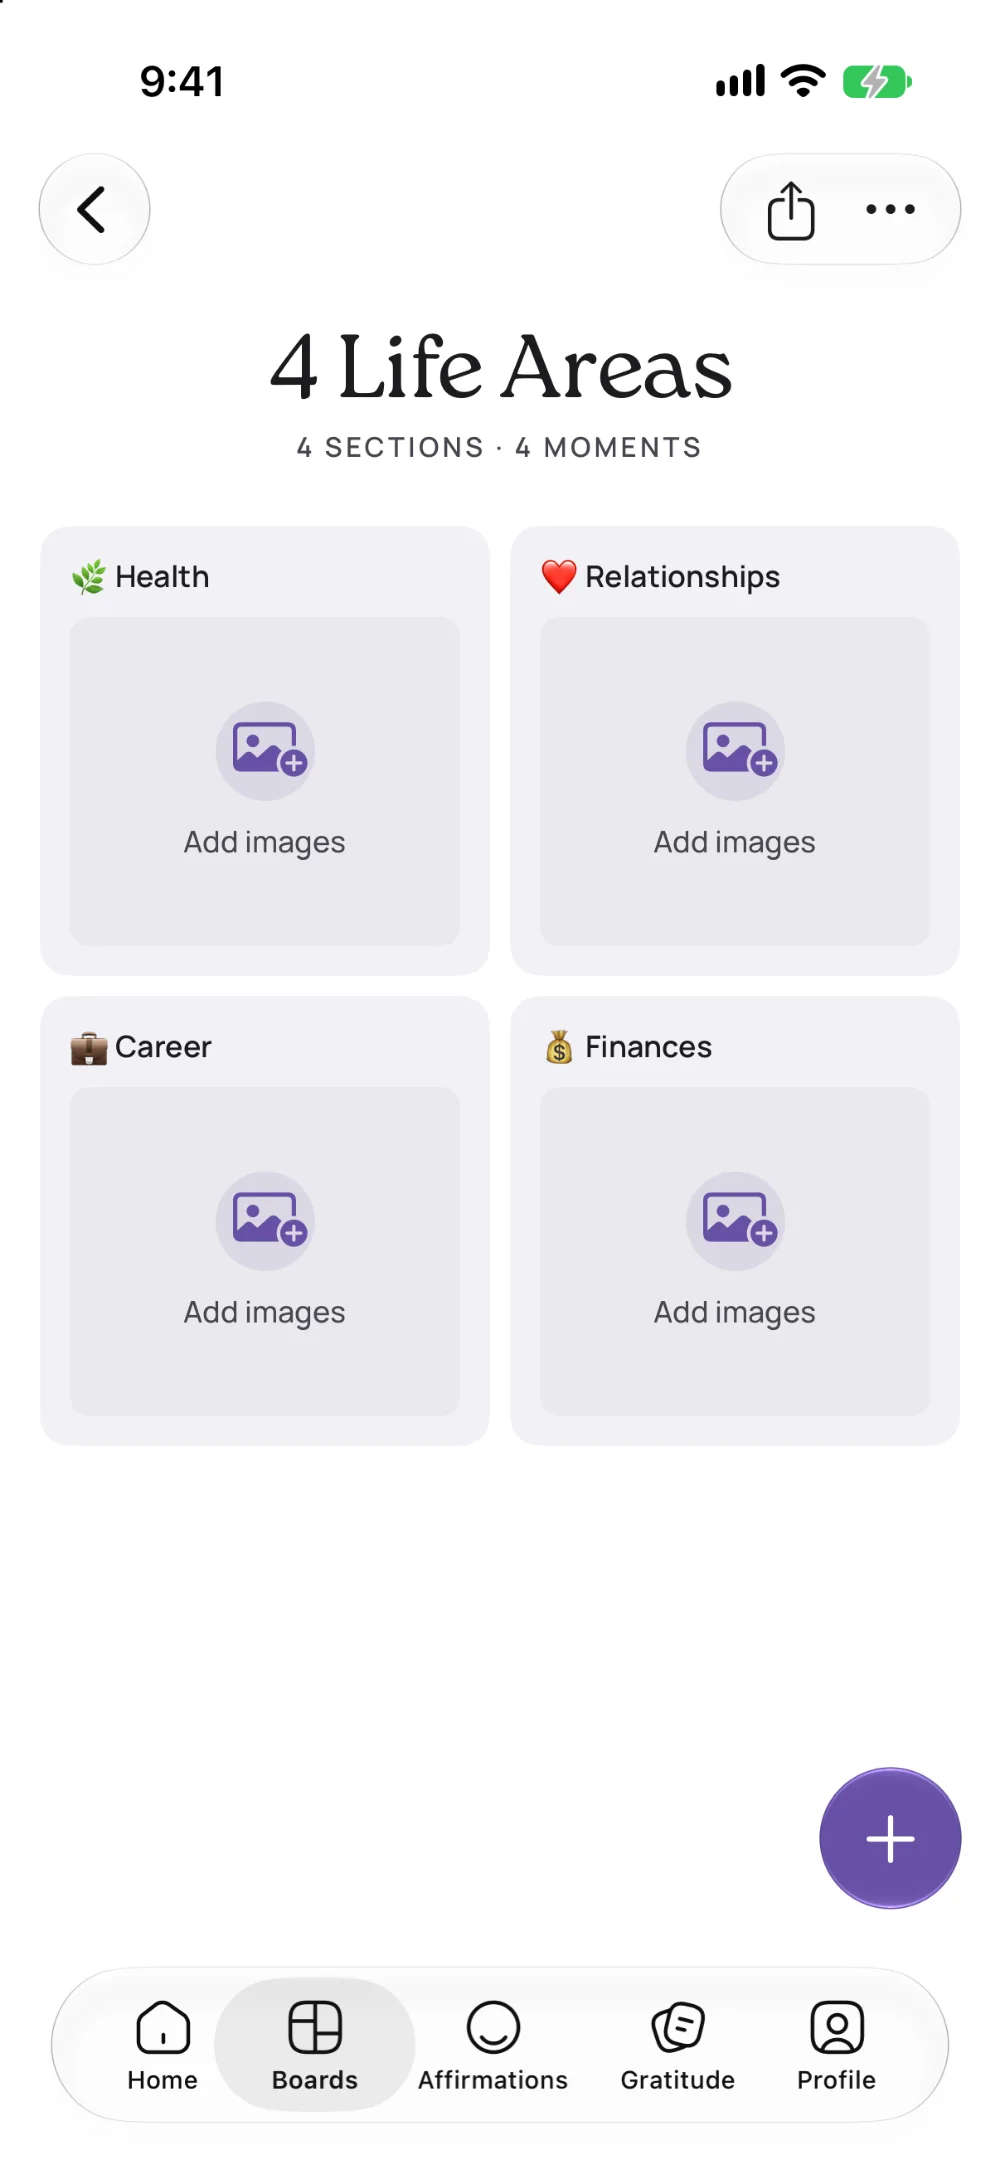
Meet your four categories
You now have a board with four tiles, one per category. They have no pictures yet, and each one says “Add images.”
Remember one thing: pictures always go inside a category. So you tap a tile first, then add things there.
Good to know: The plus button on this overview adds a fifth category, which is part of VISIYA Plus. The four from the template are enough for a first board.
Step 5
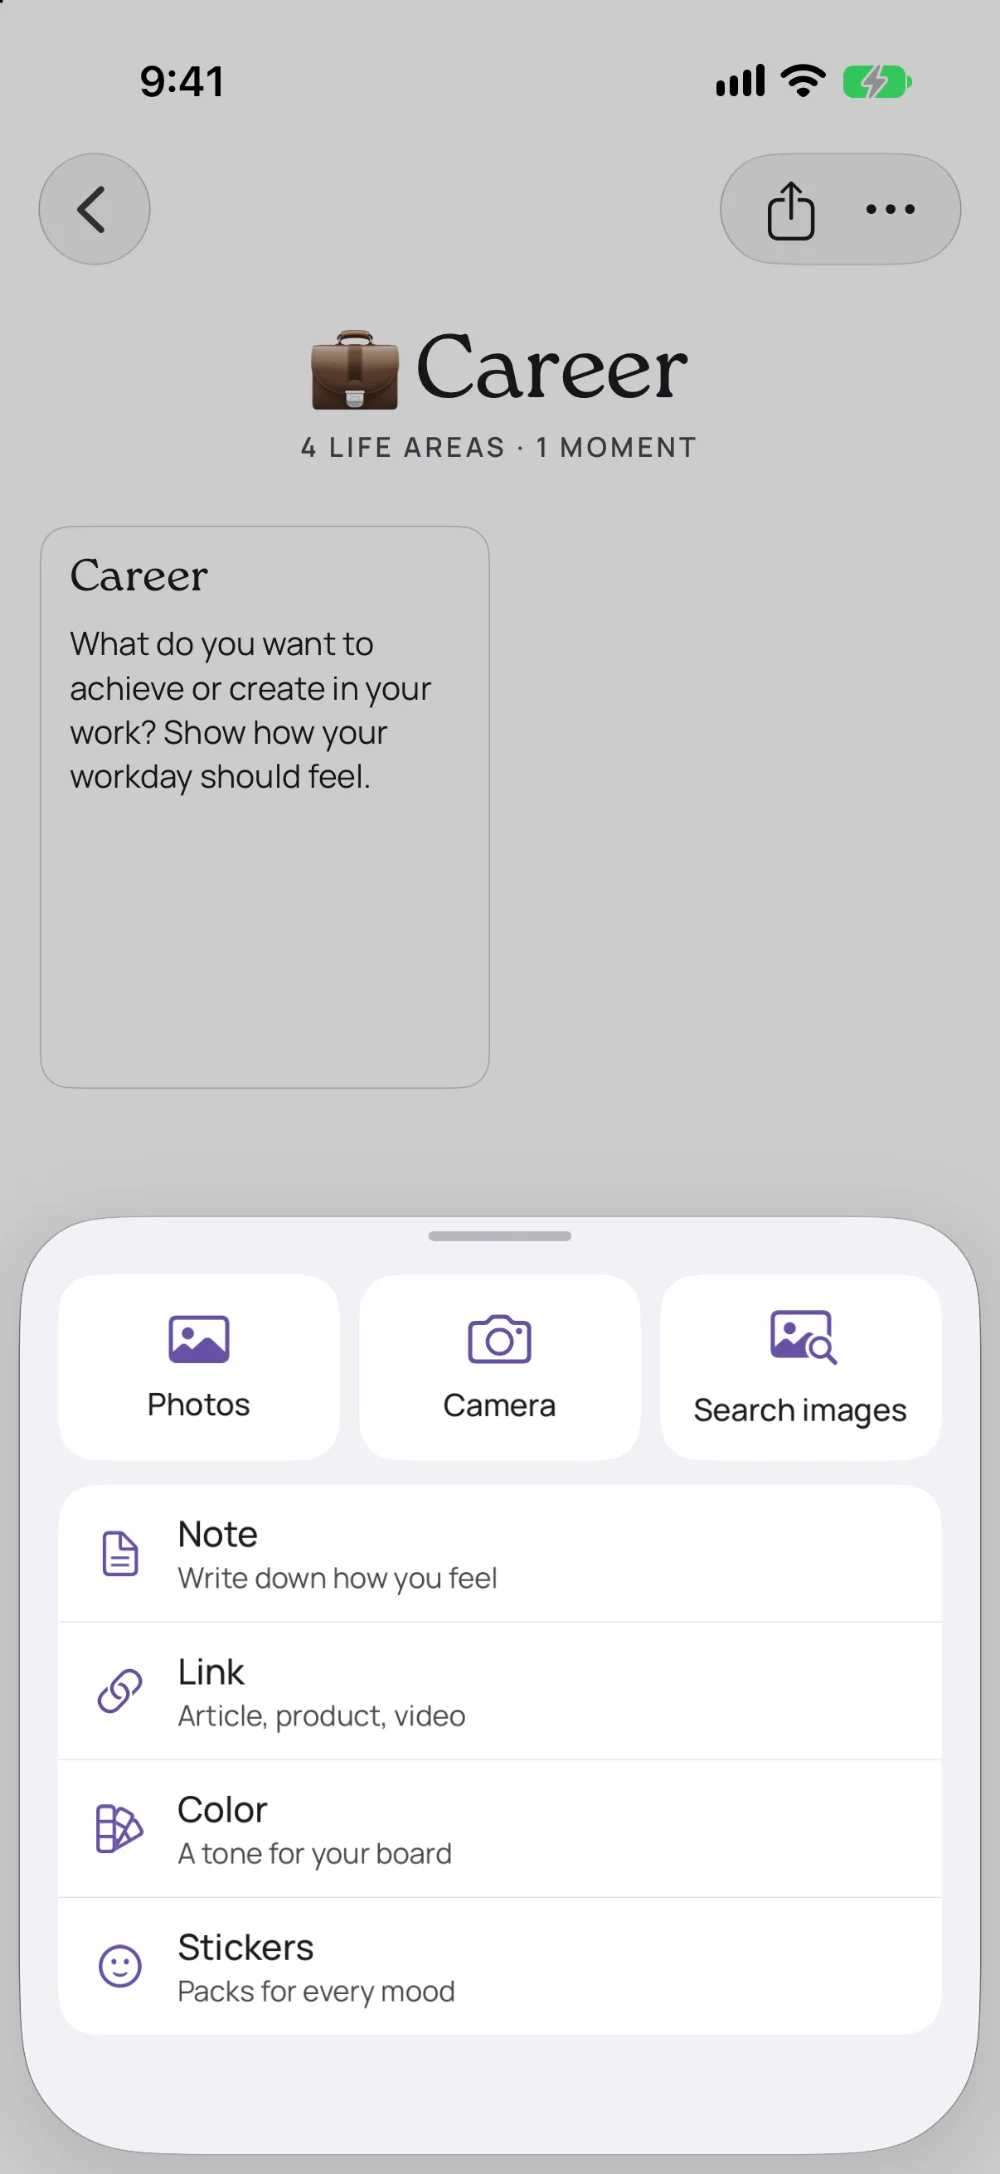
Open the category your big goal belongs to
Tap the tile where your big goal lives. For Emma that's “Career.”
Tap the plus button at the bottom. A menu opens with everything you can add: “Photos,” “Camera,” “Search images,” “Note,” “Link,” “Color” and “Stickers.”
Step 6
Search for pictures of your goal
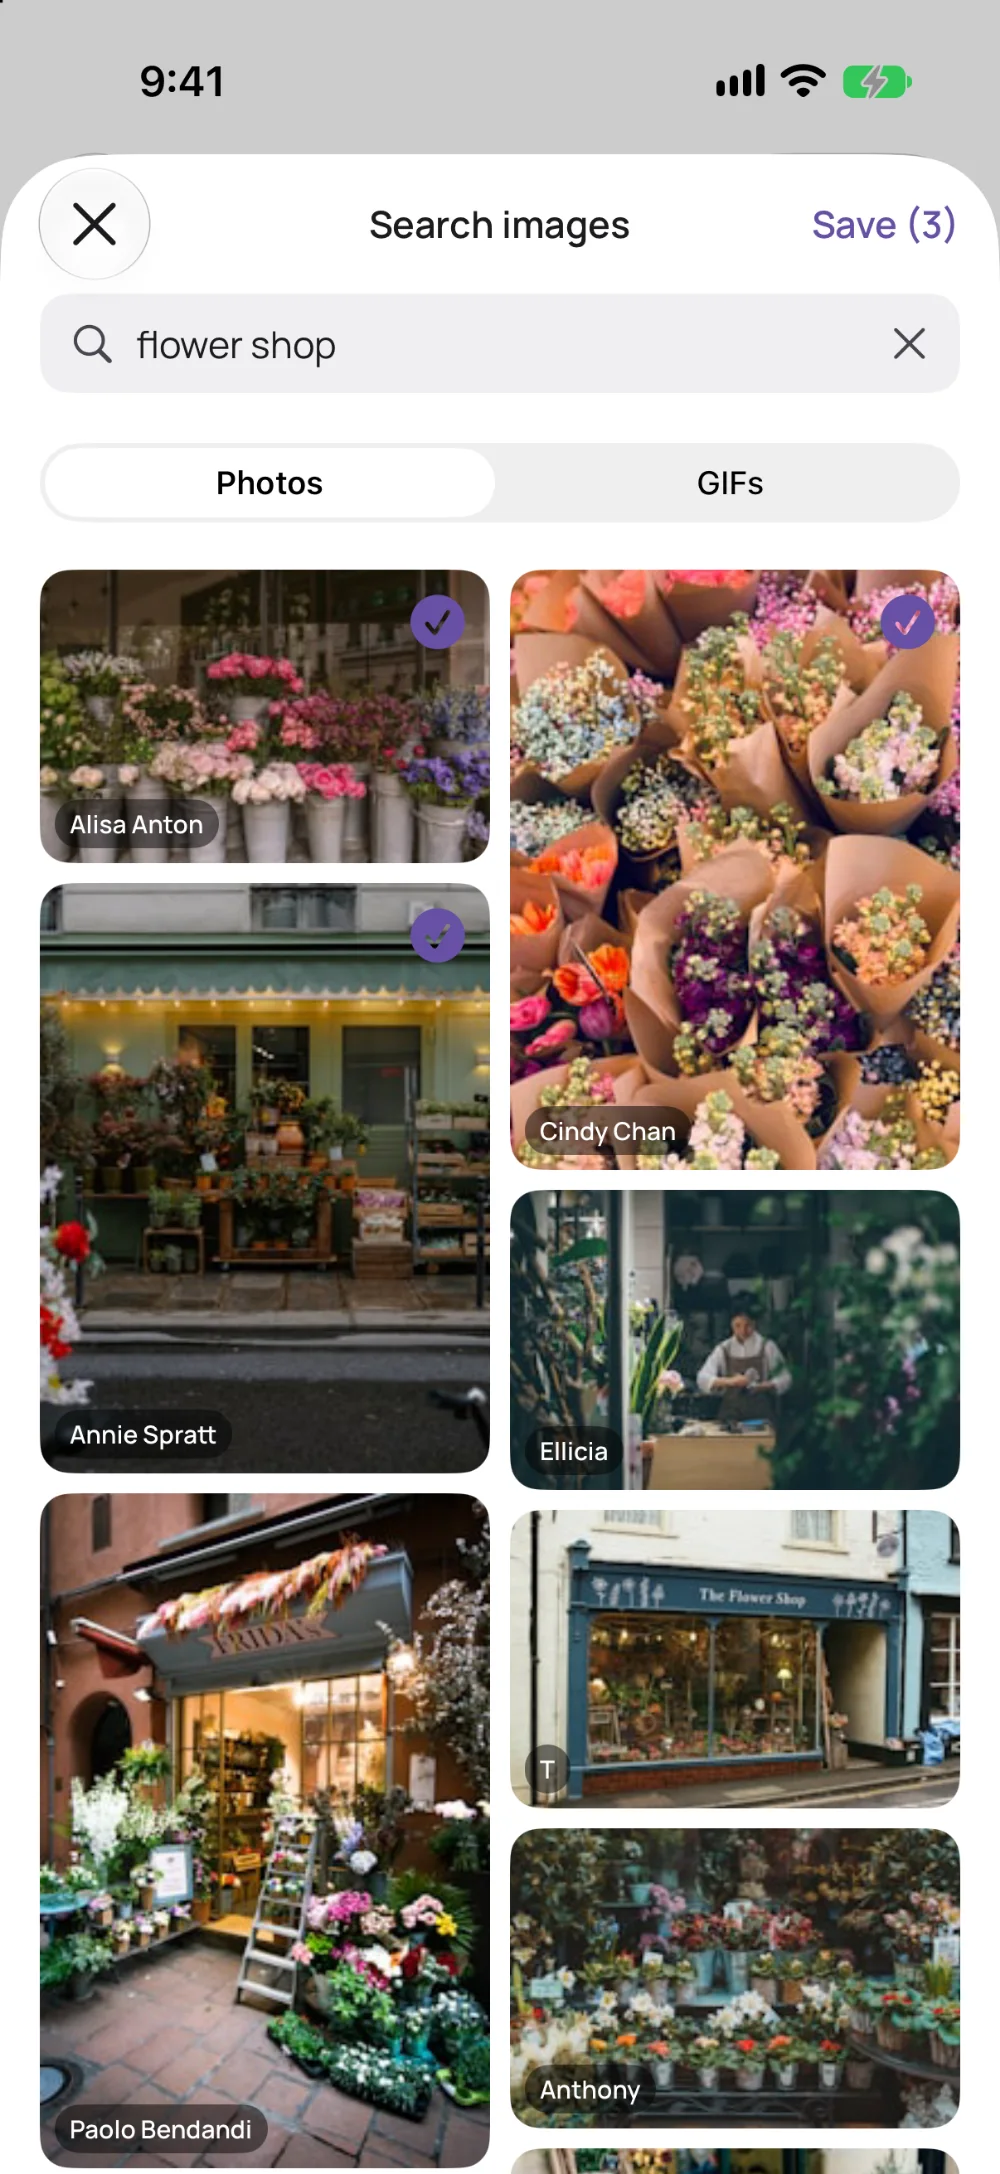
Tap “Search images.” Type what you want into the search field at the top. Emma types “flower shop.”
The pictures come from Unsplash and are free to use. Tap every one you like, and each gets a check mark. Then tap “Save (3)” at the top right. The number is how many you picked.
Tip: Search for the result you want to see. “Flower shop” works better than “success.” Then take the picture that makes you think: yes, exactly like that.
Step 7
Give your most important picture a name
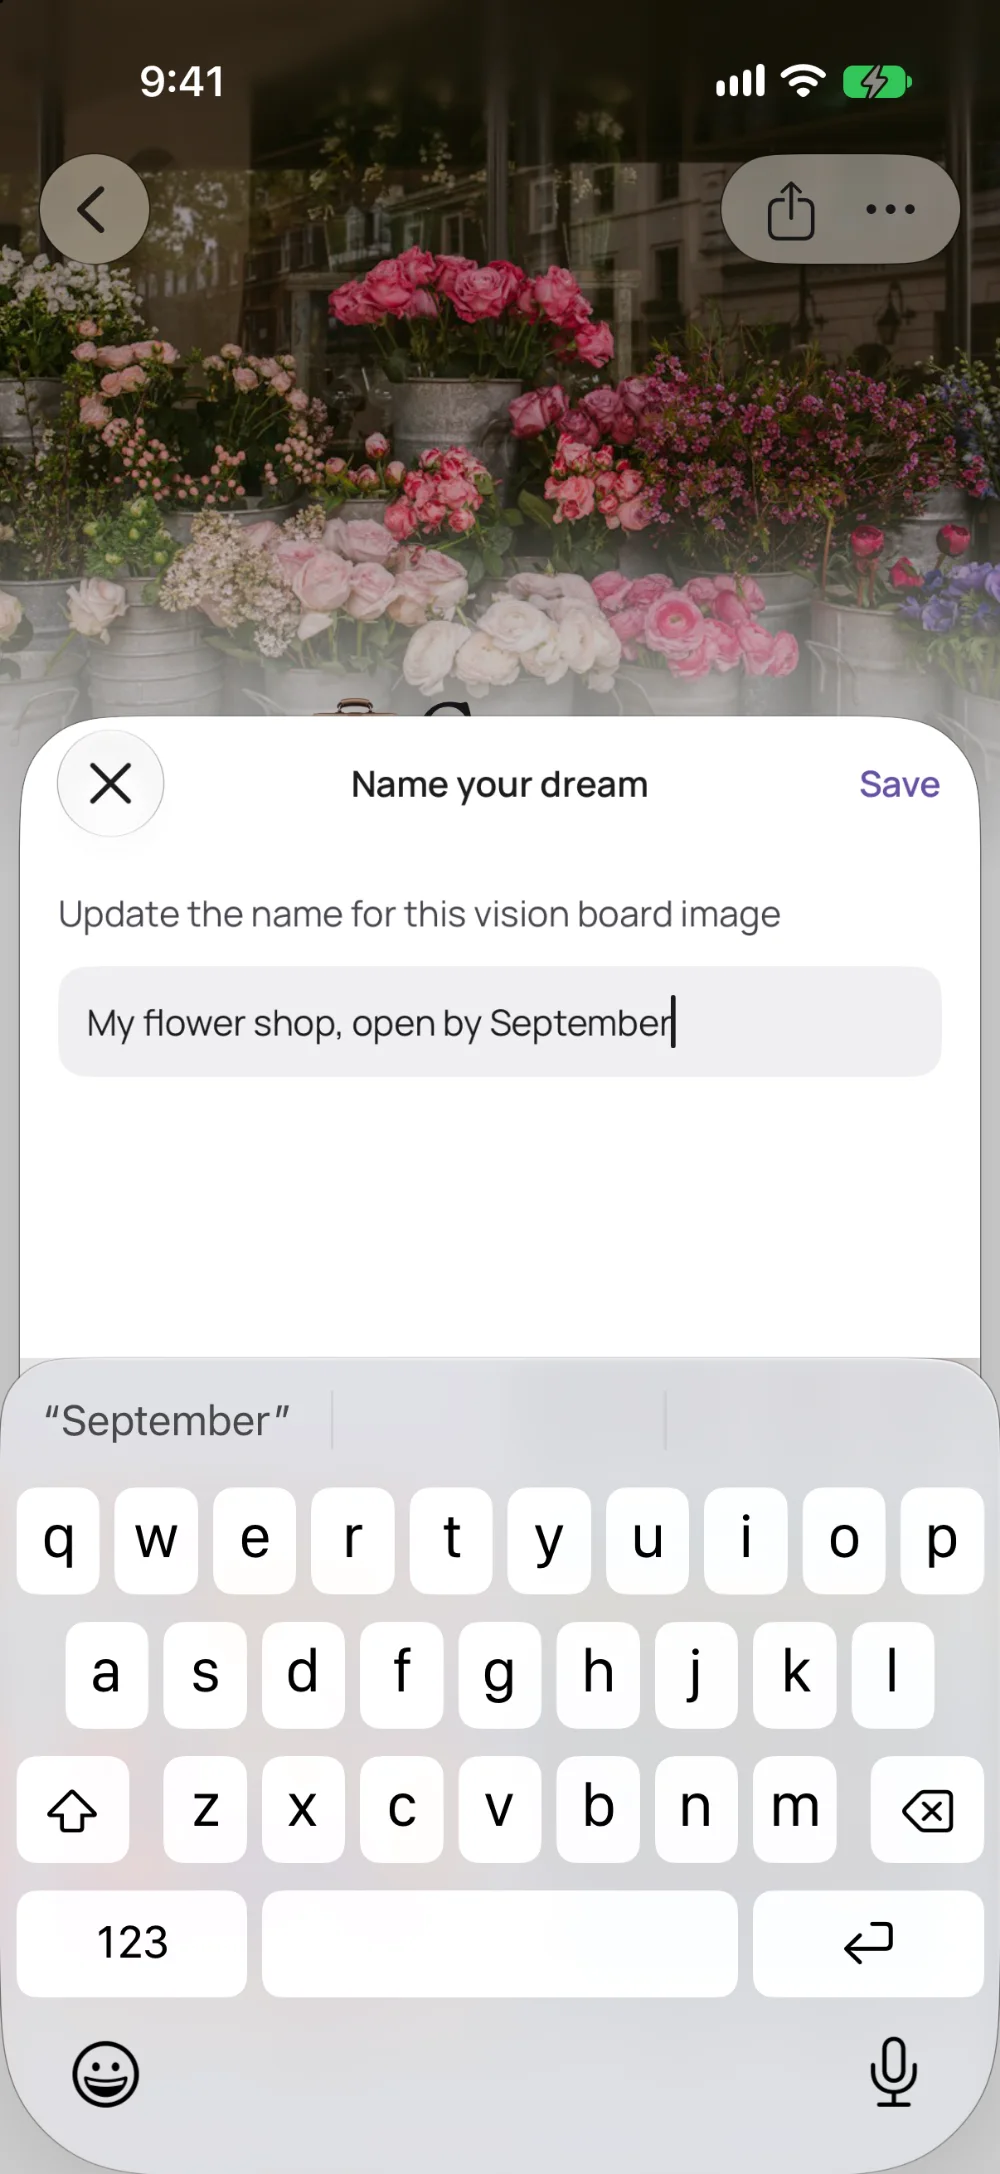
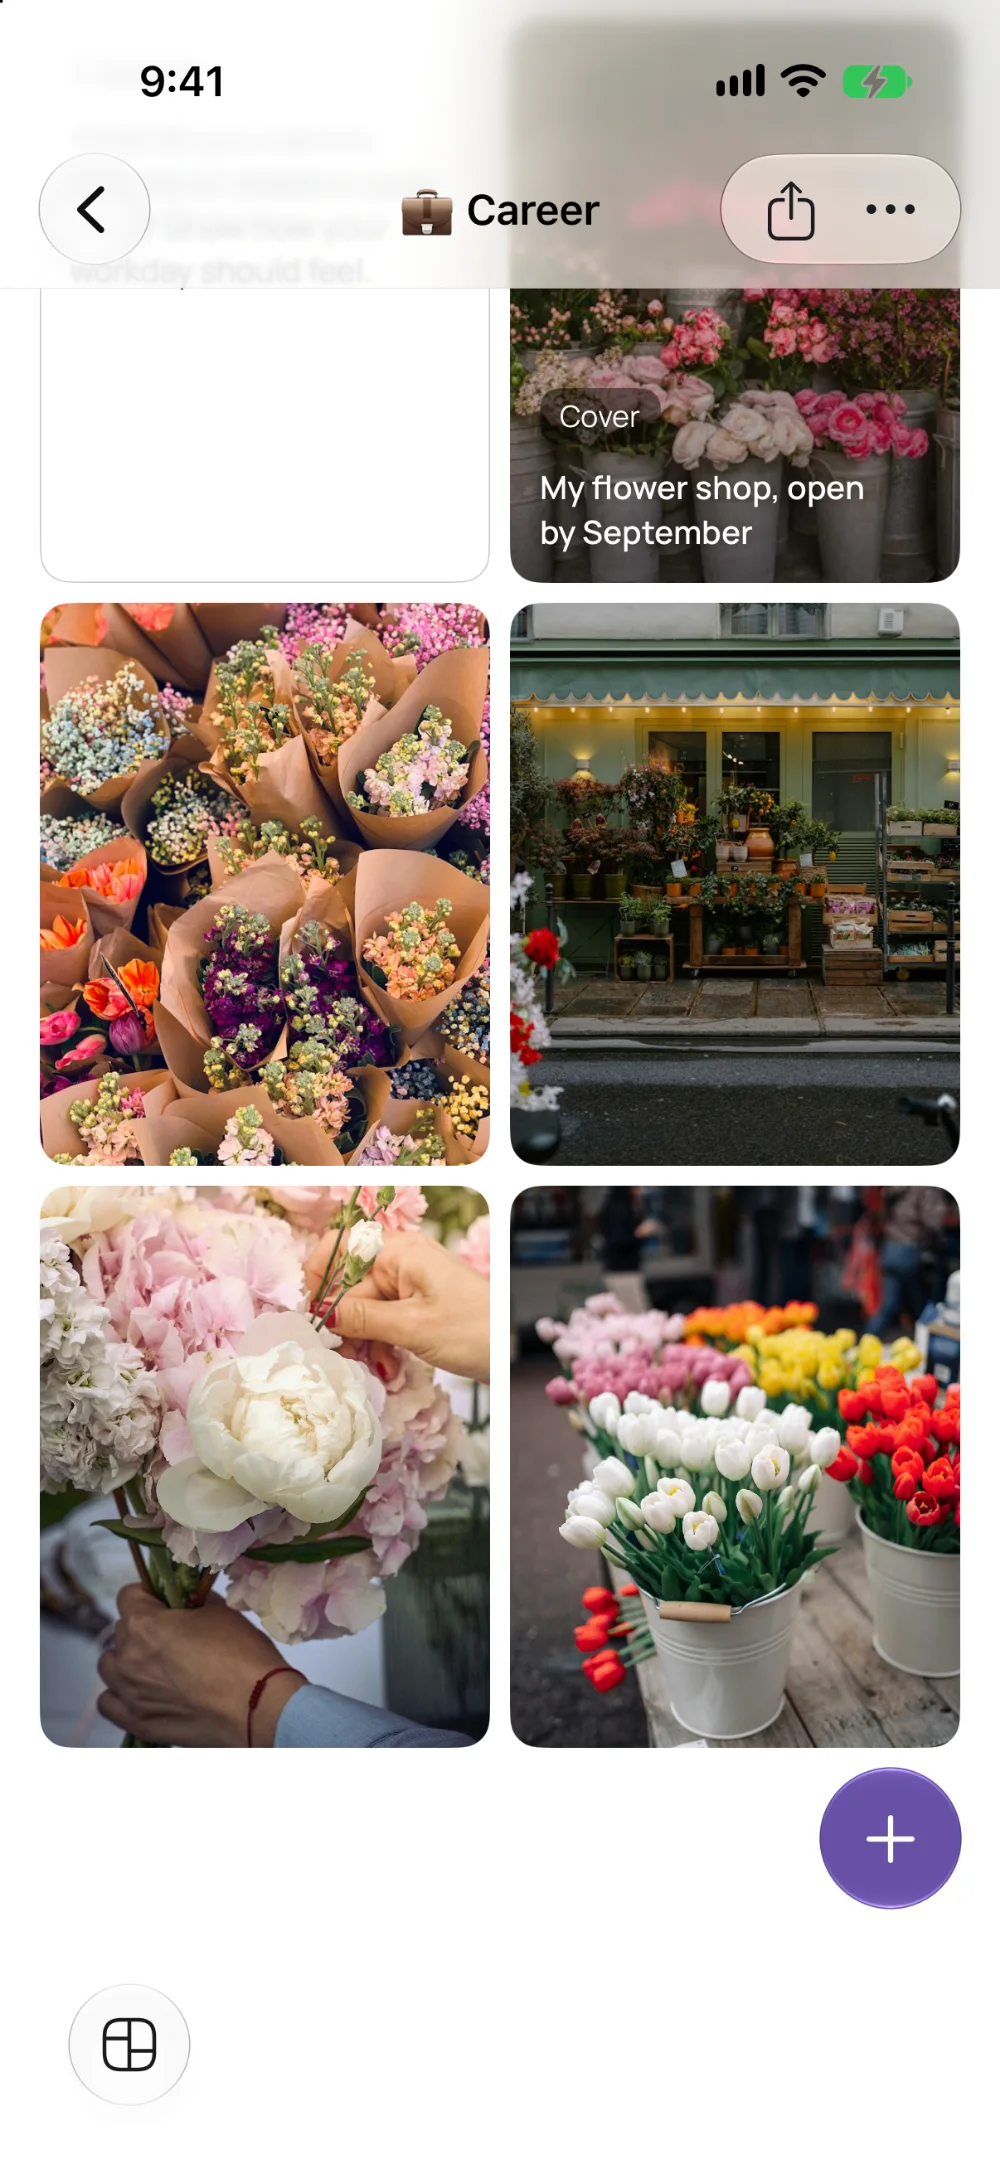
Tap the picture that shows your goal best. It opens large. Tap the pencil.
Under “Name your dream,” write what the picture means to you. Emma writes: “My flower shop, open by September.” Tap “Save.” From now on the name shows on the picture.
Tip: Write the name as if it has already happened, and add a date. That turns a nice photo into a goal.
Step 8
Add photos of your own
Tap the plus button again, then “Photos.” You can pick up to ten photos at once.
Your own photos make the board yours. Emma adds tulips from the farmers market and the first bouquet she tied herself.
Tip: No photo that fits yet? Tap “Camera” and take one of something that belongs to your goal: a magazine page, a shop on your street.
Step 9
Write down your goal, and the steps that lead there
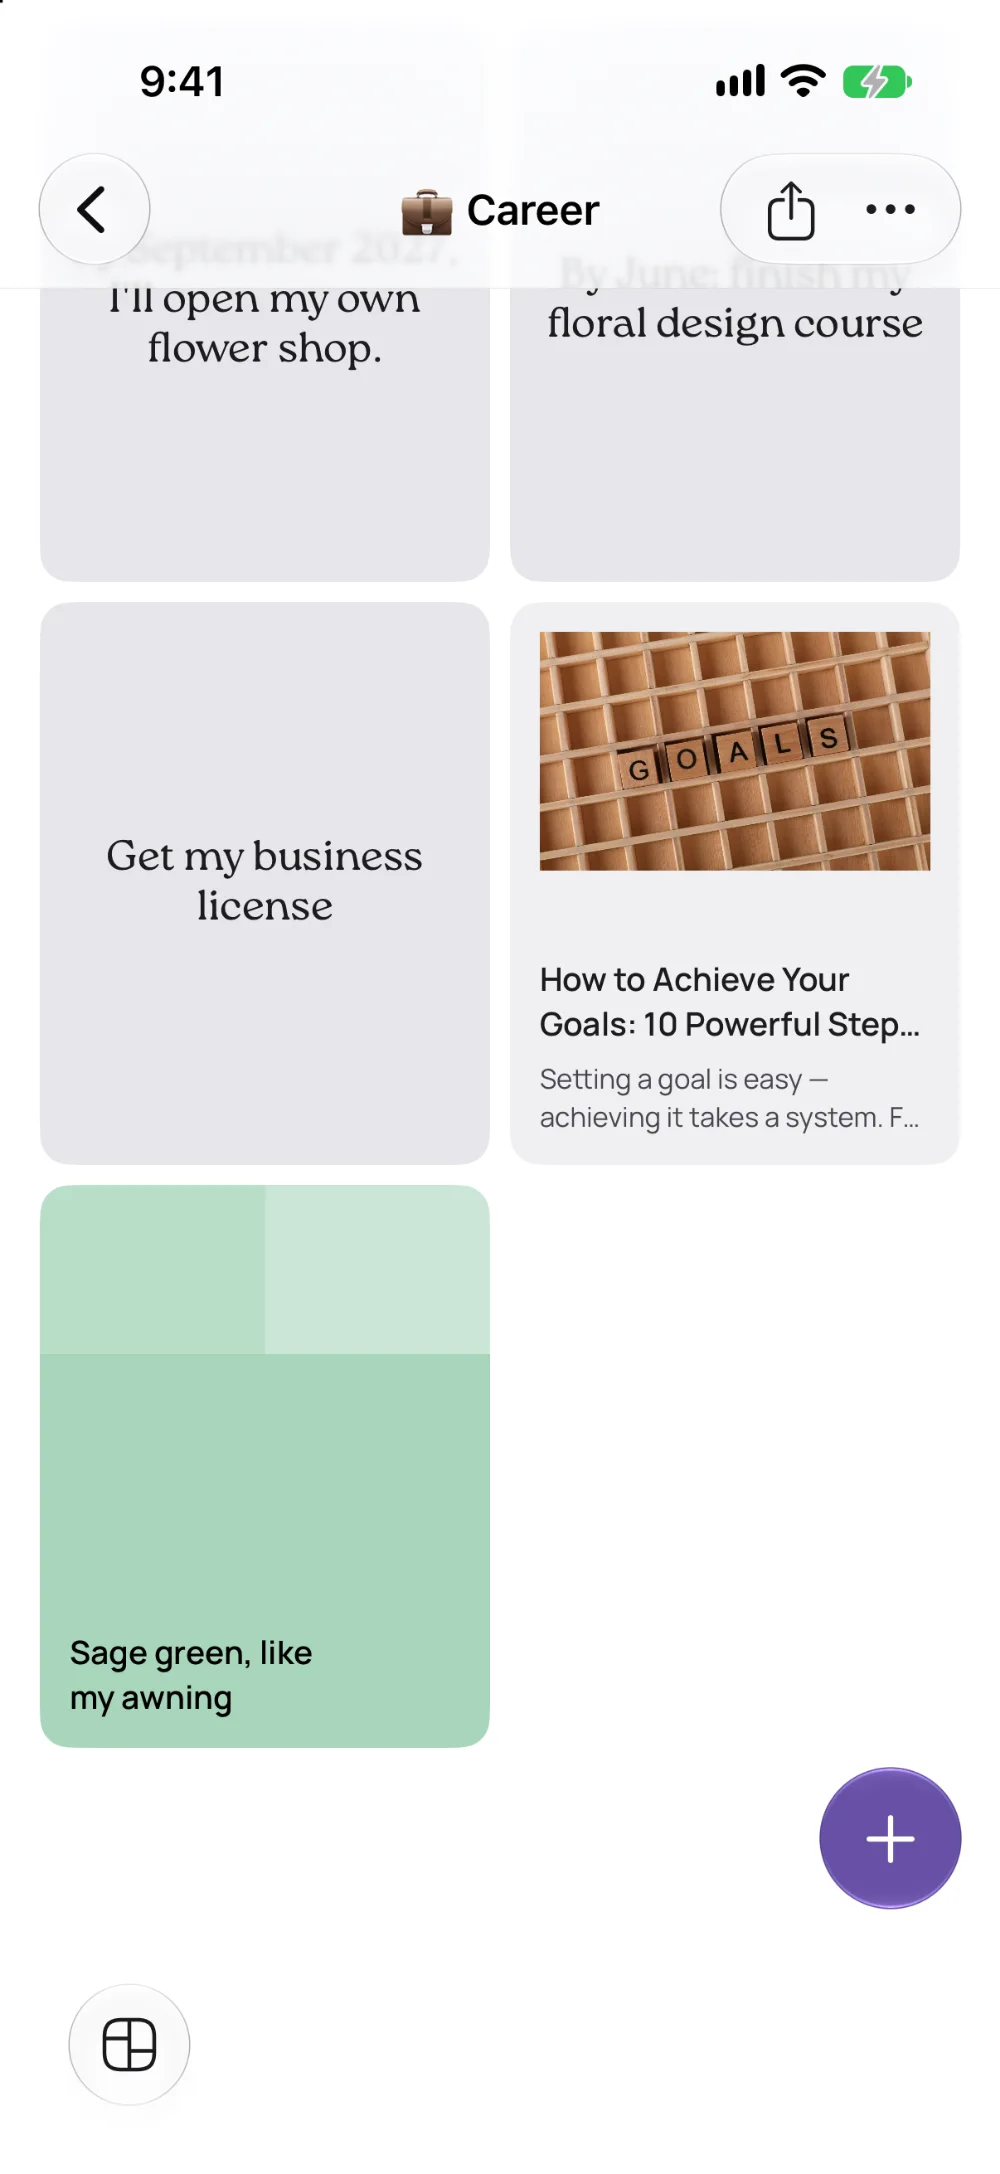
Tap the plus button, then “Note.” Write a single sentence that says what you want and by when. Emma writes: “By September 2027, I'll open my own flower shop.” Tap “Save.”
A big goal is made of smaller ones. Add a note for each step on the way. Emma has two: “By June: finish my floral design course” and “Get my business license.”
Now your board shows the goal and the road to it. When you've done a step, open its note and mark it as fulfilled.
Tip: One sentence per note is enough. If you can't say your goal in one sentence, it's still too big or too vague. Writing the steps down first helps.
Step 10
Save a link to your next step
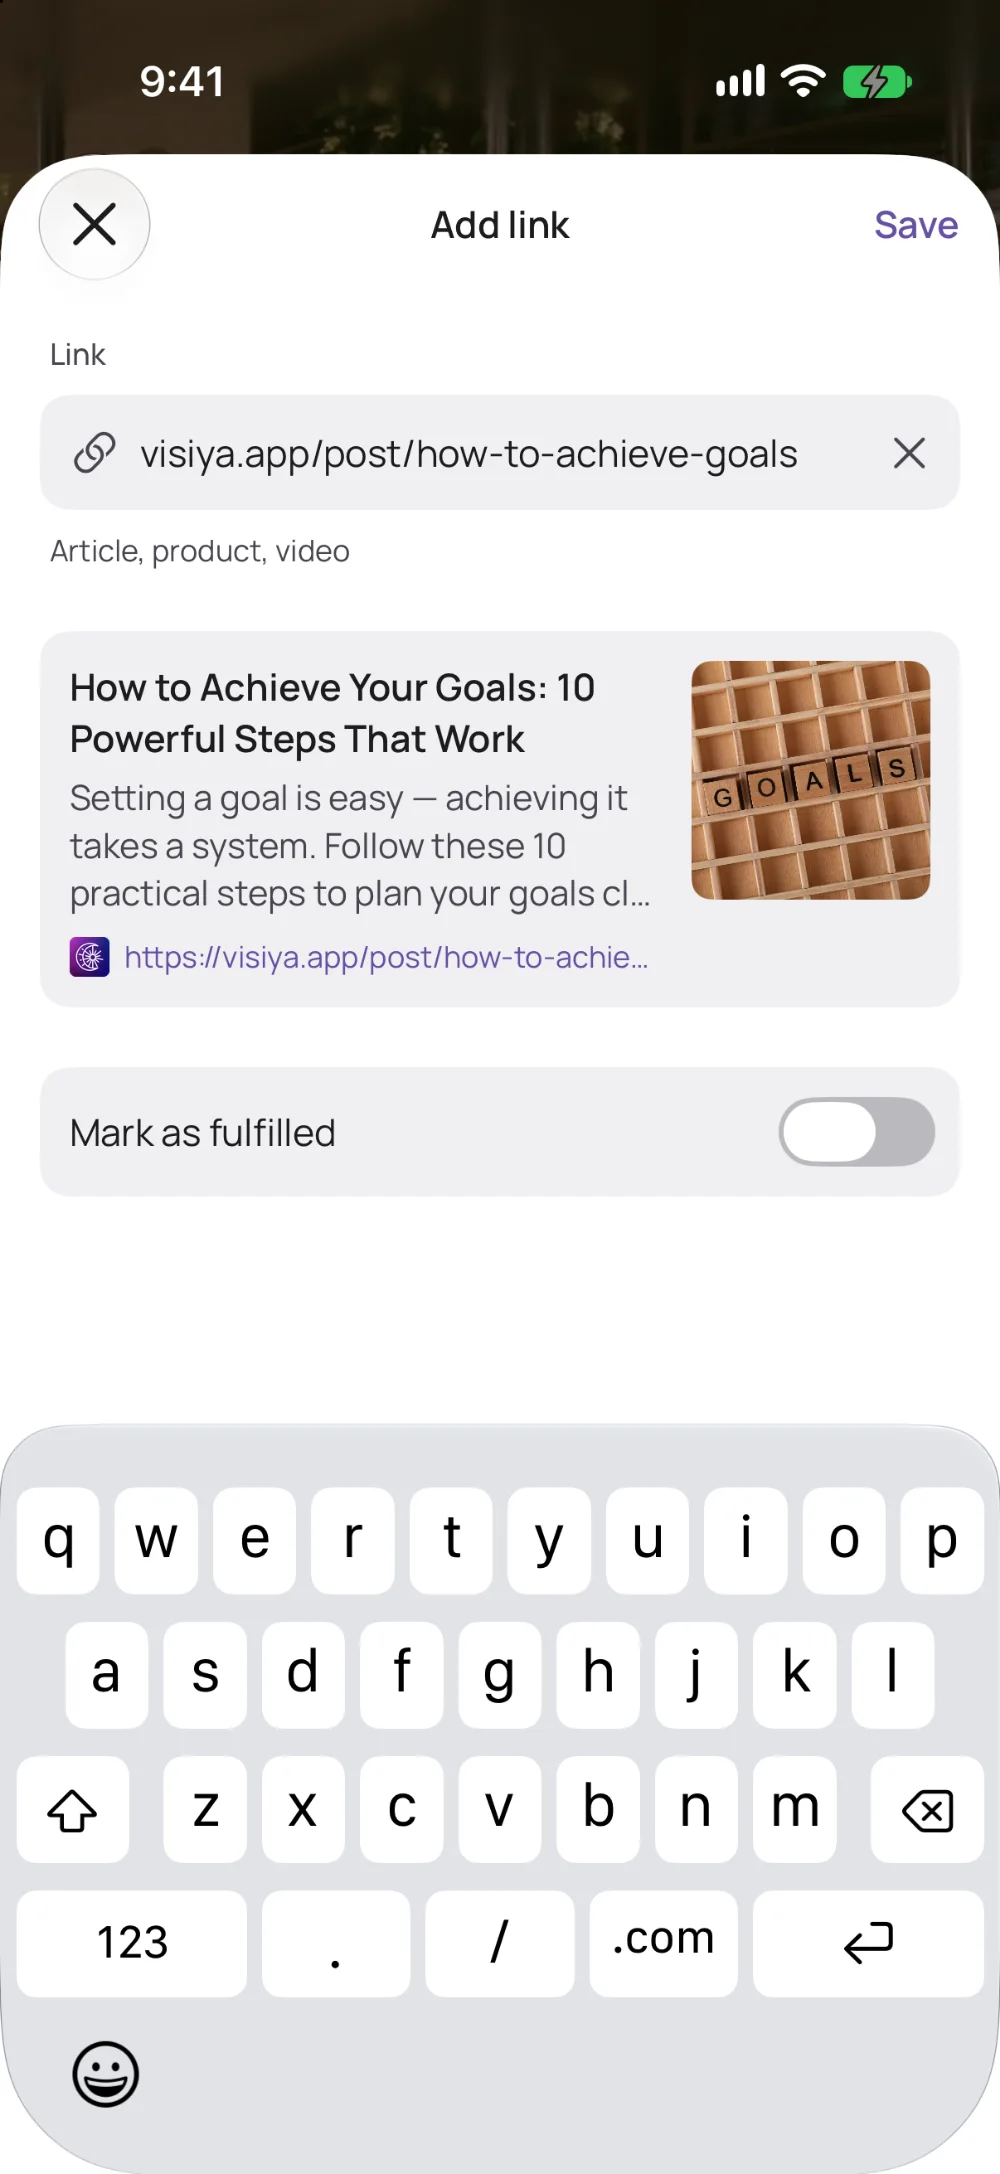
Tap the plus button, then “Link.” Paste the address of a page that gets you closer: a course, a listing for a storefront, an article.
The app shows a preview of the page. Tap “Save.” Now the first real step sits right next to the dream.
Step 11
Pick a color for the mood
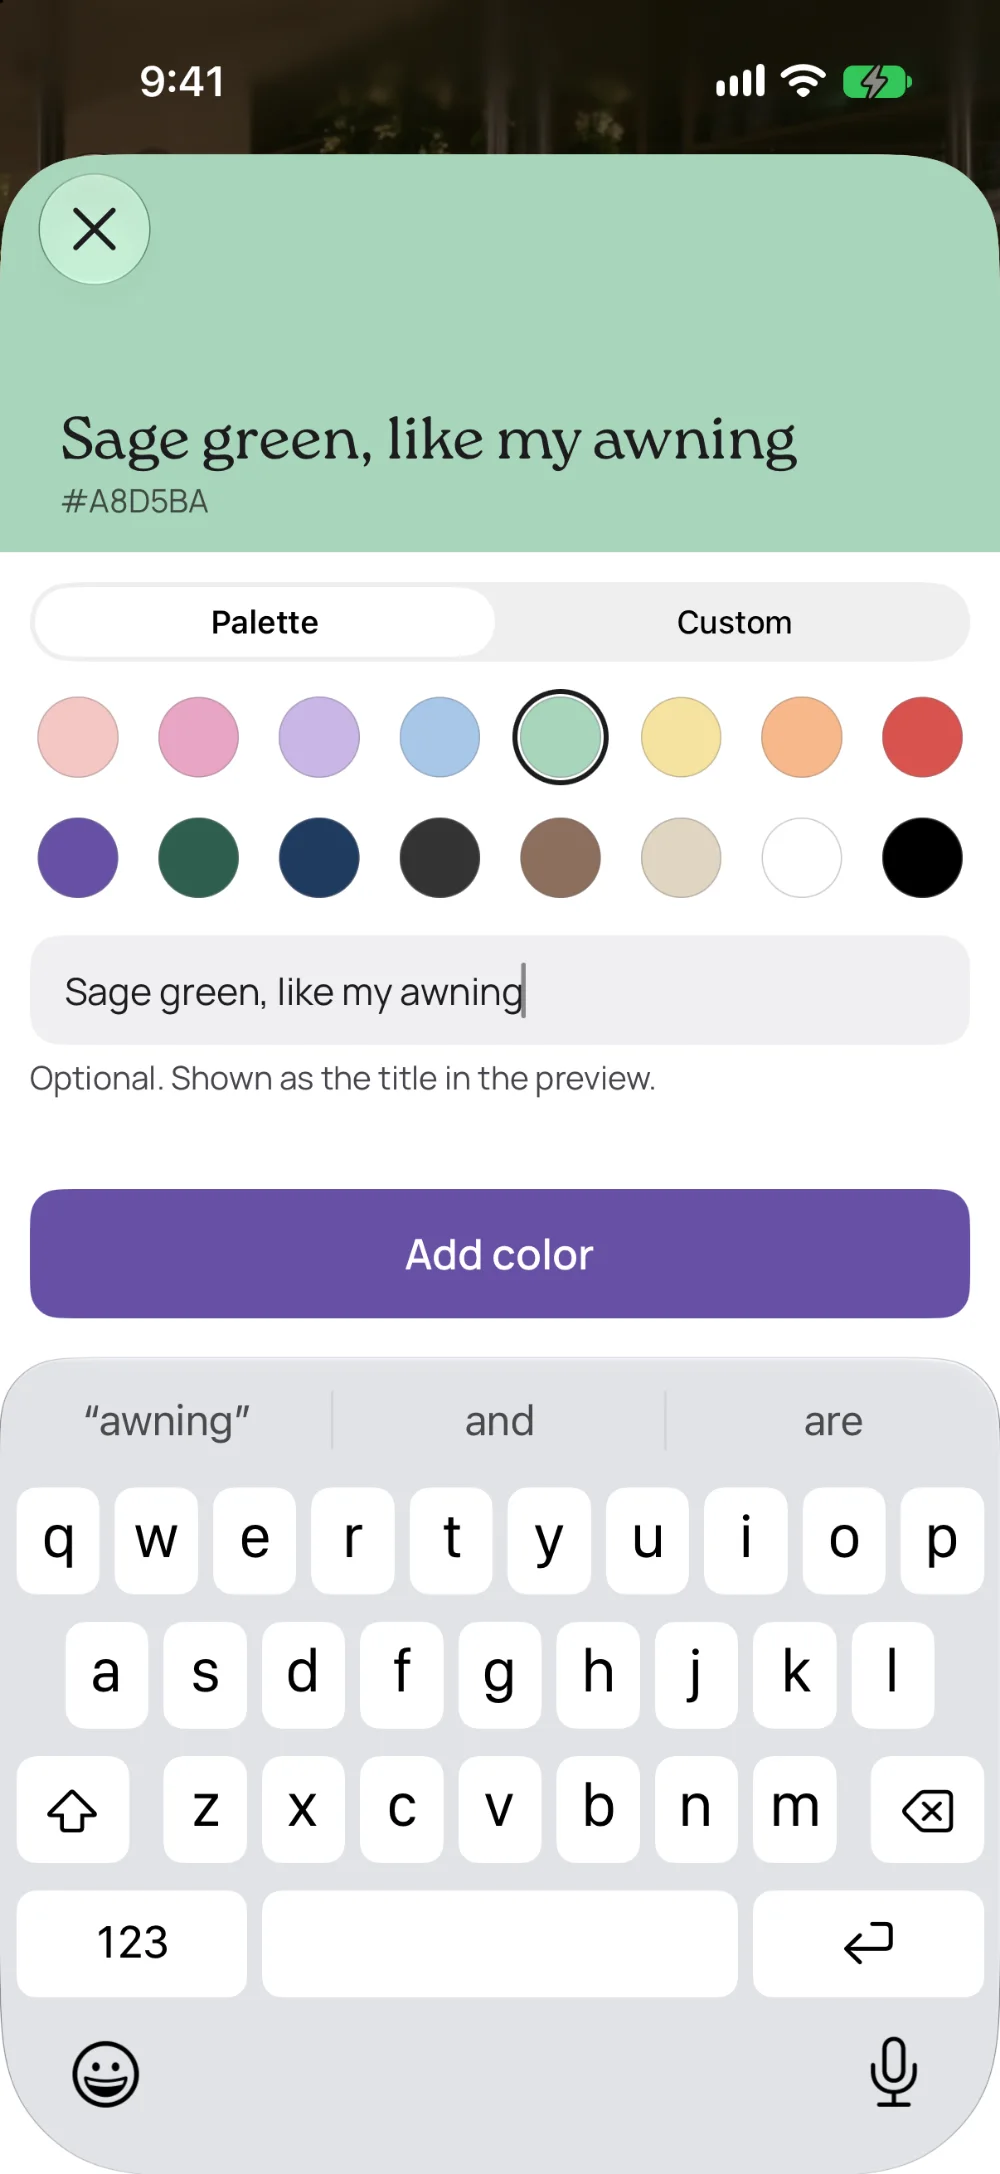
Tap the plus button, then “Color.” Choose a tone from the palette, or mix your own under “Custom.”
The color stands for how your goal should feel. Emma picks a sage green: that's how she pictures the awning, the shelves and the wallpaper in her shop. In the field below she writes what it stands for: “Sage green, like my awning.” Tap “Add color.”
Tip: Ask yourself what the walls look like, the furniture, the paper you wrap the bouquets in. Two or three colors between the pictures hold a board together.
Step 12
Fill the other three categories
Tap the back arrow at the top left. Open “Health,” “Relationships” and “Finances” one after another, and add three to five pictures to each, the same way.
Emma searches for “morning run,” “dinner with friends” and “savings jar.” Don't overthink these. They hold what still matters to you next to the big goal.
Tip: Don't leave a category empty, even if it feels unimportant right now. One picture will do.

Step 13
Add an affirmation
A picture shows where you're headed. A sentence reminds you how you want to feel on the way. Tap “Affirmations” at the bottom. The first time, pick a few topics and tap “Let's go.” The app shows you today's affirmation, and a new one every day.
If the sentence fits your goal, tap the icon with the plus. Under “Choose vision board,” pick your board and tap “Next.” Under “Choose section,” pick the category and tap “Done.” The sentence is now a note in that category.
Tip: Would you like to write one yourself? Here's how to create your own affirmations.
Step 14
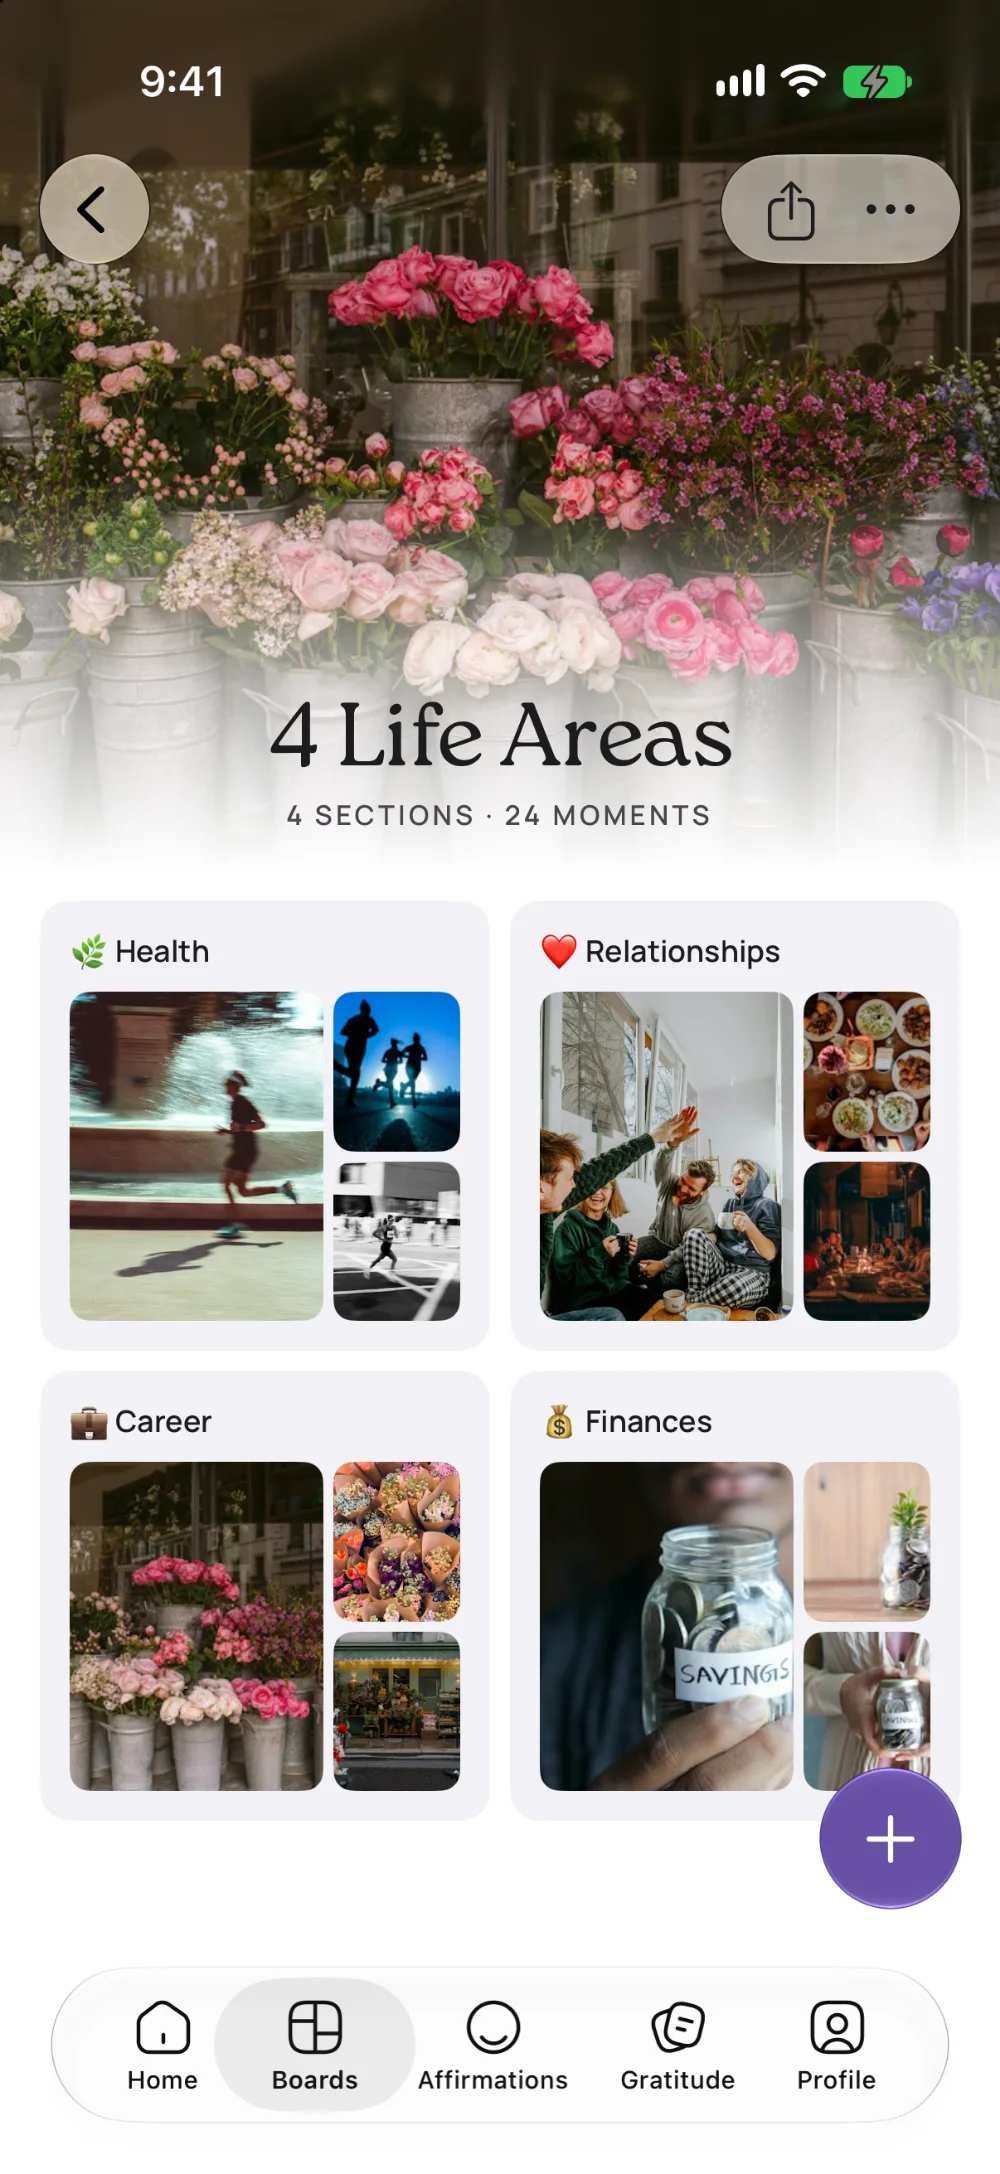
Look at your finished board
Tap “Boards” at the bottom and open your board. Four categories, each with its pictures. That's your vision board.
Do the names not quite fit you? Press and hold a tile and tap “Edit.” You can change the name and the emoji, say “Career” to “My shop.”
Step 15
See your board every day
A board only works if you look at it. The simplest habit is free: open VISIYA each morning and look at your board for a minute, before you open anything else on your iPhone. Once a month, take a little time to add to it.
The widget puts the board on your home screen. It's part of VISIYA Plus. Without Plus, it shows just the first picture. To add it, tap “Profile” at the bottom, then “Set up the widget.” The app walks you through it.
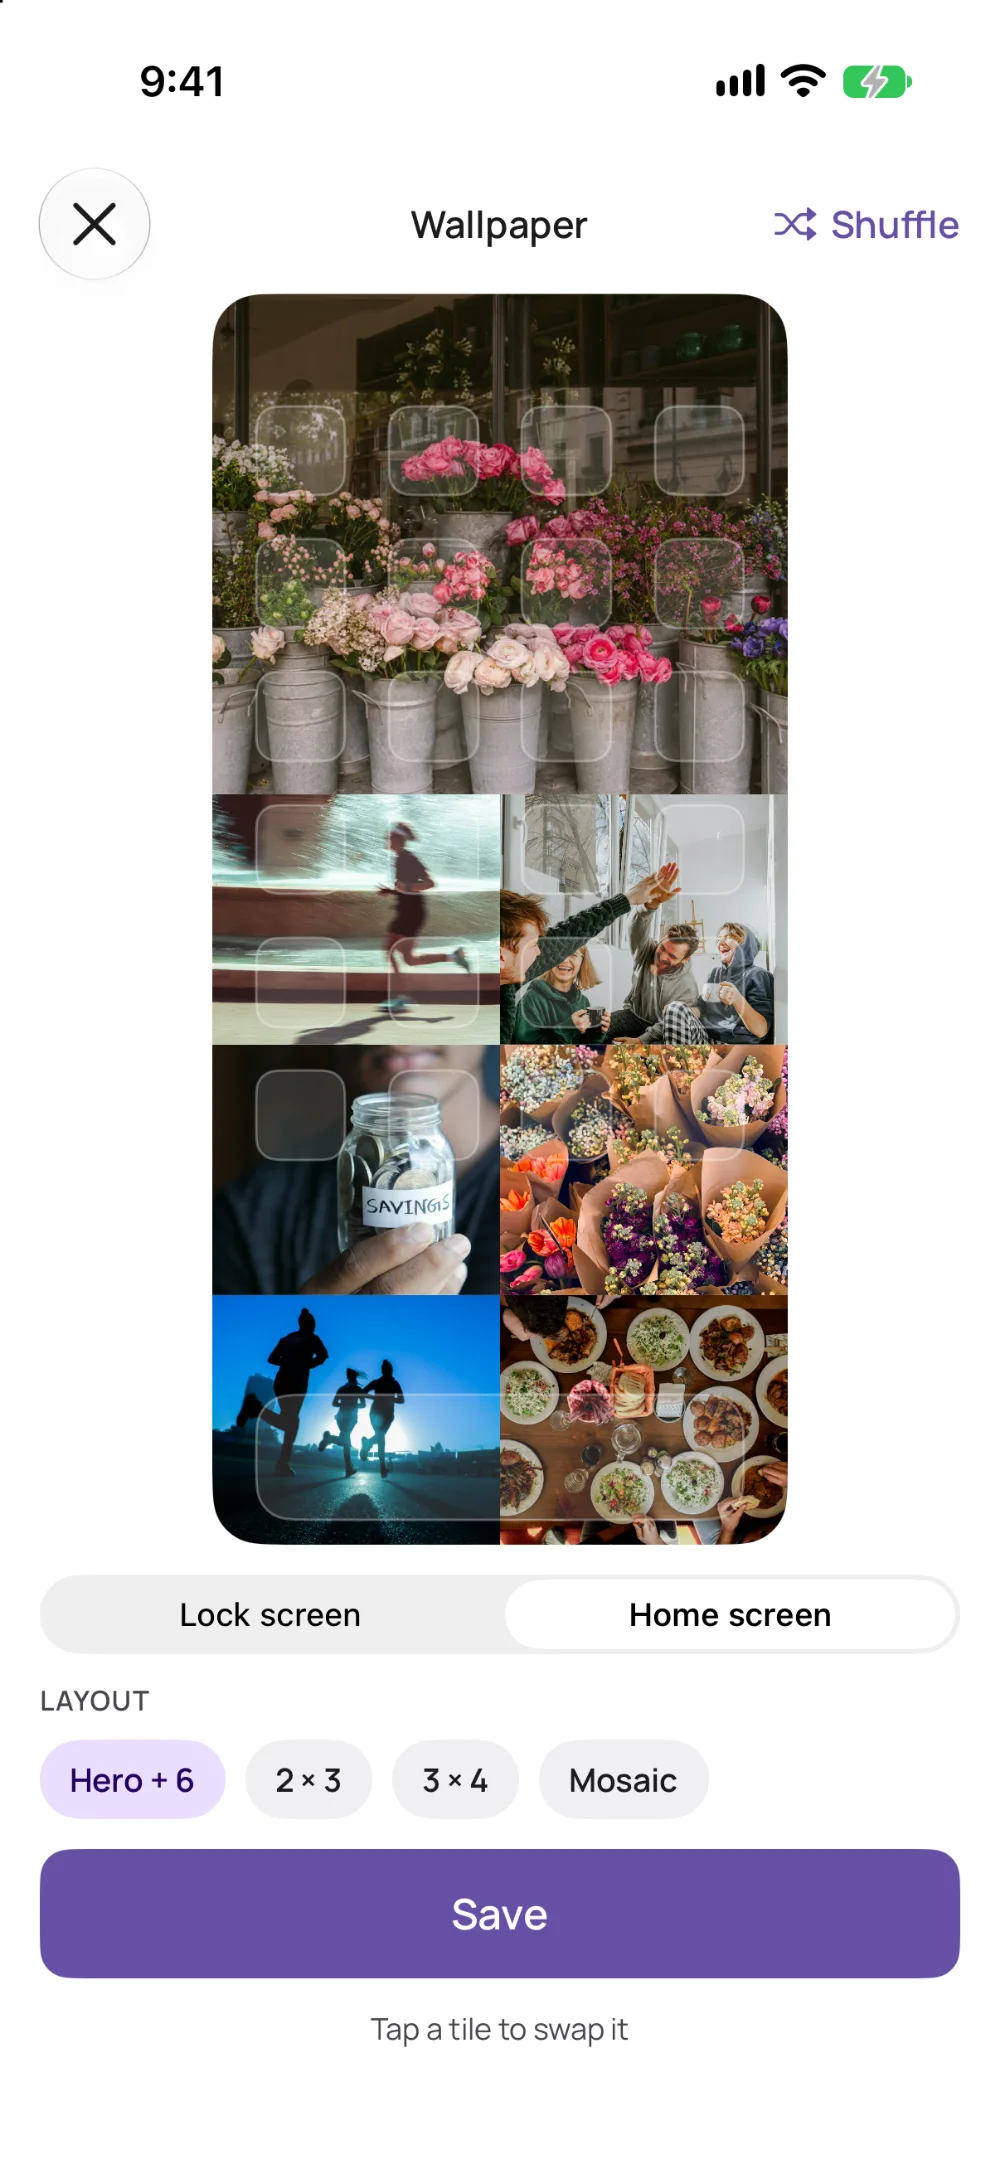
You can also turn the board into a wallpaper: open the board, tap the three dots, then “Create wallpaper.” “Shuffle” tries different arrangements. Trying it out is free; saving the wallpaper is part of VISIYA Plus.
That's it. Your turn.
Emma's board is about a flower shop. Yours is about whatever you're setting out to do next year. Download VISIYA and start with step 1.
Scan with your iPhoneQuestions people ask
Does it cost anything to make a vision board on an iPhone?
No. One board is free in VISIYA, and so is the “4 Life Areas” template. Searching images, adding your own photos, notes and links are free too. You only need VISIYA Plus for more boards, more categories, extra templates, the widget or saving wallpapers.
How many categories should a vision board have?
Four is enough for a first board: Health, Relationships, Career and Finances. Every part of your life stays visible and the board stays easy to read. Add more only when you notice one is missing.
What do you put on a vision board?
Pictures that show what you want to reach and how you want to feel, plus one sentence with your goal and a date. Your own photos make it more personal. For more ideas, see how to make a vision board.
Can I rename the categories?
Yes. On your board, press and hold a tile and tap “Edit.” There you can change the category's name and emoji.
Does this work on an iPad too?
Yes. VISIYA runs on iPhone and iPad, and with your account the board is on both. The steps are the same; the iPad just gives you more room.
How often should I look at my vision board?
A short look every day is best, for example a minute in the morning. With VISIYA Plus, the widget or a wallpaper keeps the board on your screen. Once a month it's worth adding or swapping pictures.
Keep reading
Scan with your iPhone